 OK, this is what you’ve been waiting for… we’re about to take our camera out of automatic mode. How do we do that? It’s really very easy.
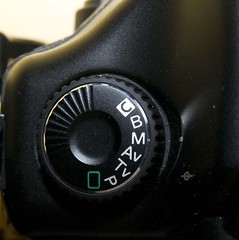
Somewhere on your camera there’s a dial that looks a little bit like this one on my 5D. It will have several settings to choose from, and may have many more than what’s shown in this photo. In order to set the exposure mode, you turn the dial so that the appropriate setting is lined up with the indicator line on the side. The line is a little bit hard to see in this photo, but the camera is in M mode. M is for manual, Magic, Master of the universe, and My favorite mode.
What are all those other modes?
- Green box: the camera just does everything for me
- P: program mode, which is much like the green box but a little less neurotic
- Tv: shutter priority mode
- Av: aperture priority mode
- M: manual mode
- B: bulb mode
- C: custom function mode (which I’m going to ignore)
I shoot with Canon gear, and therefore I’m most familiar with Canon’s controls. Those are also the cameras that I have sitting around to use as examples. (If anybody wants to send me a Nikon so that they can have equal representation, I’d be happy to go the extra mile.) I believe that Nikon calls their controls Auto, P, S, A, and M for Automatic, Program, Shutter Priority, Aperture Priority, and Manual. Other brands will have very similar functions– if you can’t figure out what they are, consult your manual.
In Auto and P modes, the camera basically just does everything for you. Typically, Auto mode is extremely obsessive about it, and won’t let you change any of the settings on your own. P mode is kind of a laid back version of Auto, one that will set the shutter speed and aperture for you, but not ignore you if you try to change something else.
Aperture priority and shutter priority are the real workhorses, and many people find that they use aperture priority more than anything else. You might too, once you figure out how they work. In aperture priority mode, you pick your own aperture, and then the camera’s meter figures out what shutter speed to use. As you can probably guess, in shutter priority it’s just the opposite– you pick the shutter speed that you want, and then the camera picks an aperture. Pretty easy, huh?
Manual mode is the final mode that you might want to use on a regular basis. In manual mode, the camera keeps its grubby little paws off the settings, and you get to choose both the shutter speed and the aperture. That sounds like a scary amount of power, right? Well, it’s not so bad. The camera’s not going to do any work, but it will still give you information. Even in manual mode, the camera’s meter works just fine, and you can use the display to help you find the right exposure.
Just for completeness, bulb mode is a special manual mode. In bulb mode, you press the shutter button once to open the shutter, and press it again to stop. This seems like a weird thing to do, and you’re right, but it’s occasionally useful for things like taking pictures of stars. You’ll probably never need to use bulb mode, but tuck the information into a corner of your brain in case it ever comes in handy.l
You’re probably wondering how you set the aperture and shutter speed on your camera. Frankly, I have no idea but if you bring it over here I’ll figure it out and tell you. Or, you can grab the manual and look it up. Here’s how mine work:
Canon 5D: There’s a dial right behind the shutter button– it controls the shutter speed. There’s a thumb wheel on the back of the camera that controls the aperture.
Canon Digital Rebel XT: There’s a dial right behind the shutter button. In aperture priority mode, this button controls the aperture. In shutter priority button, it controls the shutter speed. In manual mode, that dial controls the shutter speed. In order to set the aperture in manual mode, you press the top button (labeled Av +/-) on the back of the camera and hold it down while turning the dial. Yes, that’s a little confusing to describe. It’s actually pretty easy to do, and once you get the hang of it you’ll find it quite easy.
Next up, our first exercise!
Next lesson: Exposure modes exercise


Haha. Congrats, you explain pretty well and easy all :) . I like the “P: program mode, which is much like the green box but a little less neurotic” haha
Yours is by far the best stop for someone new.
Thank you for what you are doing.
Jose Reyes
Hi,
Thanks very much for simplifying photography to those who don’t know much. Although I know a lot about it, sometimes trying to explain it to people might be a challenge. But after reading your articles it motivate me to continue what I’m doing. Really great articles by you, keep up the good work and you will be rewarded one day for your good work.
My name is Kenroy Ambris
I’m from Trinidad, West Indies
And I’m a professional Photographer/ videographer
Nice post. People need to stop shooting in auto mode and need to use the power and flexability in their cameras. Picking up any of the advanced modes is a great start for sure.
Posted some illustration pictures here:
http://blogs.adamparkerphotography.com/blog/Canon-Shooting-Modes-What-are-the-differences/29/
Just bought a Canon 50D, and never have any experience about SLR. Try to search for some articles to see how to use it. And…your site is my stop. I enjoy reading your lessons.
I never leave any feedback, but I have to do it now. You must have a 5*
Thanks
D
Thank you!
Thankyou thankyou!
Very nice article full of basic information…