Category Archives: Controls

What Is Bulb Mode?

I’ve touched on this briefly a couple of times, but it bears a little bit more discussion.

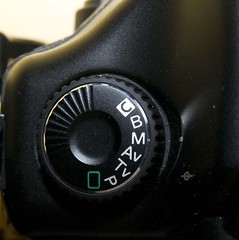
Bulb mode is kind of a special manual mode on your camera. On some cameras there’s a B mode on the exposure mode dial, but on others bulb is just a shutter speed– set the camera to M mode, change the shutter speed to 30 seconds (not 1/30, but half-a-minute 30 seconds) then go one step further. Once you’re there, set the aperture that you want to use.

Now what? Press the shutter button, and the shutter opens. Let go and it closes. You can keep the shutter open for as long as you want to, until your finger gets tired or your camera runs out of battery.

In order to make effective use of bulb mode, you really need another piece of hardware– a remote shutter release of some sort. I’m pretty sure that there are wired shutter releases available for all dSLRs and probably all film models too. In the simplest version, you plug the cable into the side of the camera, and when you press the button on the cable it activates the shutter. (This works in all camera modes, not just bulb.) In bulb mode, holding the button down holds the shutter open. Slightly fancier models have a shutter lock so that you can activate the shutter and then walk away for a while.

Many cameras also have wireless shutter releases available. These basically function the same way, except that they sometimes have two-press operation– press the button once to open the shutter. Press it a second time to close it. If you have a Canon Digital Rebel (original, XT, or XTi) the Canon RC-1 is a valuable addition to your kit. It lives on your camera strap and is completely unobtrusive when you don’t need it. If you want to release the shutter remotely, you just pop the RC-1 off of the strap and it’s ready to go. When you’re done, pop it back onto the strap and it’s out of your way. It’s not just for long exposures– it’s valuable whenever you want to be away from the camera, such as when you want to be in the photo. When I used a Rebel XT all the time, I was always reaching for the RC-1.

Some cameras may require you use the self-timer setting in order to use a remote shutter release.  Consult your manual for the details of your specific model.

Why would you want to use bulb mode? Mostly it’s for very-long exposures of over 30 seconds, but it has other uses too. I use bulb mode a lot when I’m shooting fireworks– I try to open the shutter just as a rocket is going up, and close it as the explosion fades. You can set the camera on a tripod at night and shoot the path of stars moving across the sky, or capture blurs of cars driving through the city.  Though I have no first-hand experience, bulb mode is also used for taking pictures of lightning strikes.  I’m sure there are plenty of creative uses that I can’t even imagine.

IMG_7804Another cool technique that uses bulb mode is light painting. Light painting involves taking the camera into a darkened room, opening the shutter, and then using light sources (LEDs, flashlights, whatever) to paint light onto an object or just onto the sensor itself. While it didn’t use bulb mode, the image at left was taken by opening the shutter in a dark room then moving an LED glow ball in front of the camera.  As you might have guessed by now, I like playing around in front of a camera with bright objects in a dark room– you just never know what kind of cool image you might wind up with.

Bulb mode is a specialist tool, but it’s a really useful one to know about.  You probably won’t need it very often, but sometimes it’s the only real choice for getting the shot you want.

10 Comments

Filed under Controls, Exposure, shutter speed

f/8 and Be There

IMG_1088

There’s an old saying among photojournalists– f/8 and be there. Sometimes the technical details of a photograph really matter, and sometimes they don’t. Perfect technique won’t help you if you don’t have your camera ready to go when the moment happens.

As you may have heard, the Olympic torch made an appearance in San Francisco today. In fact, it was scheduled to pass just a block from my office. I normally just hop in the car and drive to work, but I was worried that parking would be expensive and the neighborhood would be a zoo, so I opted for public transit. I took the ferry across the bay to San Francisco (and snapped some fun pictures, but accidentally erased them… I don’t function well in the morning), and encountered lots of protesters near the ferry building.

I knew this was likely, so I already had the camera ready to go. In particular, I put the camera in aperture priority mode, set the aperture to f/8, picked a lens that I was happy with, and made sure that autofocus and image stabilization were turned on. f/8 is the perfect middle-of-the-road aperture, since it will give you enough depth of field to compensate for minor focus mistakes, and will let in enough light to get decent shutter speed in daylight.  I also put the camera in multiple shot mode, so that if something was changing quickly I could just hold down the shutter button and hopefully get one of the shots timed perfectly.

Later in the day, I increased the ISO to 400– I was shooting a lot of stuff that was in shadows, and I wanted to make sure I had plenty of latitude in my shutter speed.

(I made one mistake in camera settings, but I was able to work around it OK. Can you spot what it was?  It’s hiding in the photo’s exif data.)

By spending a little bit of time up-front thinking about how I would be shooting, I was able to just forget about the mechanics of the camera and pay attention to what I wanted to shoot.  The picture above is one that I almost got right, but not quite… if only the bloody video guy hadn’t walked in front of me just as I pressed the shutter button.  Still, if I didn’t tell you that you might think he was another protester, and I’d almost be off the hook.

When shooting fast is really important, think about your camera settings in advance and figure out what you need in order to be able to forget about them.  In typical broad daylight shots, that’s probably aperture priority mode and f/8.

5 Comments

Filed under Aperture, Controls, Equipment

What is bracketing?

I wrote a little bit about bracketing earlier, but it’s an important concept and it deserves its own entry.

You’ll often hear photographers talk about bracketing an image. Bracketing sounds pretty technical, but it’s really just a fancy term for taking multiple shots of the same image at slightly different exposures. With some scenes, it’s really hard to know whether you’ve gotten the exposure right, and it’s worth taking a few extra shots to make sure one of them will be good.

Let’s say that you’re shooting a scene and the camera’s meter thinks that the right exposure is f/8 and 1/200 sec. Maybe it is, but maybe that will result in a little bit of underexposure or overexposure. If you wanted to bracket one stop on either side, you could take one shot at f/8 and 1/100 sec, one at f/8 and 1/200 sec, and one at f/8 and 1/400 sec. Alternately, you could take one at f/8 and 1/100 sec, one at f/5.6 and 1/100 sec, and one at f/11 and 1/100 sec. Either way, you’d wind up with three images and if the camera was anywhere close to being correct you probably will wind up with one perfectly-exposed image.

In the days of film, bracketing was often a necessary but expensive operation. Digital cameras have made it cheap to take multiple exposures, since there are no film developing costs. Flash cards are both cheap and reusable, and you can fit lots more images onto them than you could on a roll of film.

Bracketing sounds cool, but I bet it also sounds like a lot of work. Want me to make it easier for you? OK, piece of cake.

All modern dSLRs have a function called automatic exposure bracketing, or AEB. When you enable AEB, you tell the camera how large an increment you want to use, and then whenever you press the shutter the camera takes three images– one at what it thinks is the correct exposure, one underexposed by the amount you specified, and one overexposed by the same amount. Click click click. You can usually specify the size of the compensation in 1/3 or 1/4 stop increments up to two full stops, sometimes three

Look at the specifications for your camera, and you’ll see something that looks like this:

AEB: +/- 2.0 EV, 0.5 or 0.3 EV increments

That means that you can bracket plus or minus two full stops, and you can choose either 1/3 or 1/2 stop increments. EV means Exposure Value, and it basically means the combination of aperture and shutter speed for an exposure.

Voila! All you have to do is turn it on, and your camera will do the work for you. Consult your camera’s manual to figure out how to enable exposure bracketing on your camera.

In situations where the lighting is tricky, I highly recommend using aperture-priority or shutter-priority mode and then bracketing your shots. This will give you a much better chance at getting a perfectly-exposed image.

Now, go try it out! Put your camera into either aperture priority or shutter priority mode, and enable automatic exposure bracketing. Find something well-lit, and take a picture. You’ll hear three clicks of the shutter, and wind up with three images. (It’s like a buy-one get-two-free sale.)

For extra credit, put the camera in manual mode, set the aperture and shutter speed to what the camera thinks is the right exposure, and then manually take three shots, changing the shutter speed to bracket by one full stop. Look through the viewfinder and check the meter before each shot. For one it should be right in the center, for one it should be one stop to the left, and for the third it should be one stop to the right of center.

2 Comments

Filed under Controls, Equipment, Exposure

What does f/8 really look like?

Yesterday I talked about apertures (a.k.a. f-stops) and how they work. As the old saying goes, a picture paints a thousand words, and this is after all a photography blog. Without further ado, I present f/8:

f8

Pretty cool, huh? That’s what it would look like if you could look inside your lens while you were taking a picture. As you can see, the blades of the diaphram (that’s the thing in the lens that opens and closes to change the aperture) have closed down to make an opening that’s much smaller than the full opening of the lens. What this means is that a lot less light will get into the camera than if the lens was wide open.For reference, here’s what the lens looks like wide open:

f1_8

Notice that you don’t see the blades of the diaphram at all. If you were to look into your camera’s lens right now, you’d see something just like this because the diaphram only closes while you’re actually taking a picture.

The lens in the picture is a Canon 50mm f/1.8 lens. (Aside: if you have a Canon dSLR, I highly recommend buying this lens. At a retail price of less than $80, it’s a screaming deal.) Since it’s an f/1.8 lens, it has a maximum aperture of… that’s right, f/1.8. The minimum aperture is f/22, which is pretty typical for non-specialized lenses.

Here’s what the full range of the lens looks like. I didn’t take a picture of every possible setting, but you can probably figure out for yourself what the ones in-between look like:

f1_8 f2 f3_2
f/1.8 f/2 f/3.2
f4 f5_6 f8
f/4 f/5.6 f/8
f11 f16 f22
f/11 f/16 f/22

A lot of what I’ve been saying about aperture probably makes more sense to you now that you’ve seen those pictures. All other things being equal, a photo taken at f/2 is going to be about a bezillion times brighter than one taken at f/22. That’s because the amount light that comes in through a great big window is way higher than the amount that comes in through a pinhole.

By the way, I apologize for the reflections on the lens. Taking pictures of glass is notoriously difficult, and I was feeling a little bit too lazy to set up enough of a lighting rig to do a better job. Mea maxima culpa. (If you want to learn sophisticated lighting techniques, I recommend the excellent Strobist blog. Stick around here for a bit and master the basics first, though.)

Now you’ve seen my f-stops. Want to see your own? Here’s a little mini-exercise to do just that.

Most modern cameras have a button called depth-of-field preview. On my Canons, it’s if you’re looking at the camera from the front, the DOF preview button will be next to the lens, on the right side, toward the bottom of the camera. It’s just below the button that you use to take the lens off. If you can’t find yours, check your camera’s manual.

Now, set your camera for manual mode, and an aperture of f/8. We don’t care about any other settings right now, because we’re not going to take a picture. Look into your lens, and press the depth-of-field preview button. Did the diaphragm close? If so, you now know what f/8 looks like on the lens you’re using. Try different apertures to see how it changes.

If your camera doesn’t have a DOF preview button, there’s another trick you can use. Set the camera for manual mode, f/8, and about a 20-second exposure. Press the shutter button (yes, take a picture) and look into the lens. You’ll have 20 seconds to look into the lens and see the diaphragm. Like before, you can try out different apertures and see what they look like.

When you started reading this blog, you probably kept your camera in automatic mode all the time. And now, a short time later, you actually know your f-stop from a hole in the ground. If I’ve done a good job, your brain isn’t even bleeding out your ears.

As it turns out, aperture is one of the most powerful tools in photography. In the next couple of lessons I’ll show you why.

Next lesson:  Aperture: Why You Care

9 Comments

Filed under Aperture, Controls, Lesson

Exercise: exposure modes

Are you ready for the first exercise? Great, let’s go. If you haven’t ready the last lesson on how exposure modes work, you’ll want to do that first. In this exercise, we’ll try out the various exposure modes in order to learn how the controls work.

OK, grab your camera. It doesn’t matter what lens you use, but try to find a place with a lot of light and something at least marginally interesting to point the camera at.

The first thing we’re going to do is put the camera in aperture priority mode. If this is the first time you’ve taken your camera out of its everything-automatic rut, this may be scary for you. Don’t worry, I’ll be right here to hold your hand. Now, take a deep breath and turn the dial to Av, A, or whatever your camera calls it.

See? That wasn’t so bad.

Now, pick out something nearby that you can focus on. Maybe it’s a picture or a piece of furniture or a tree, but pick something that isn’t going to move around a lot. Now, look through the viewfinder of your camera and focus on the thing that you picked out. Press the shutter button halfway, and you should see a display in your viewfinder that will tell you what the aperture and shutter speed are set to.

Turn whatever dial it takes on your camera to open the aperture as wide as it will go– remember, that’s the lowest number. It may be as low as 1.4 or 1.8, but more likely your lowest setting will be somewhere between 2.8 and 5.6. It doesn’t matter for now. Keep pointing the camera at whatever object you picked out.

If you did that quickly enough, which you probably didn’t, you’ll still have a display in your viewfinder. If not, push the shutter button down halfway to get it back. Make a mental note of what shutter speed the camera has picked out. Now, turn the aperture dial a few clicks. Do you see the shutter speed change? (If the display goes away, just keep pressing the shutter button halfway.) Keep doing this until the aperture is as small as it will go– most likely, that will be around 22, but your lens may be different.

Did you notice how the shutter speed changed automatically every time you changed the aperture? That was your camera’s meter picking out the right shutter speed to go with the aperture you chose. It’s possible that your camera had trouble with the highest and lowest settings, and couldn’t find a shutter speed fast enough or slow enough to work. If so, it probably kept the needle all the way on the left or right of the meter display, and maybe flashed it or beeped or complained in some other way. If so, remember that for the future. It’s your camera’s way of saying that something’s not right.

Now, let’s do the same thing but in shutter priority mode. Set your camera to Tv or S or whatever. Look through the viewfinder, and press the shutter button halfway. Turn the magic dial to change the shutter speed, and watch the selected aperture change. If you pick a really fast shutter speed like 1/1000, there’s a good chance you’ll get to see how your camera complains about bad exposures.

OK, there’s one more step, but before we take it you probably need a quick break from all this scariness. Get up, walk around the room, do a jumping jack, grab a beer, or do whatever it takes to get past all the scariness I’ve thrown at you.

Are you back? Excellent. Now, we’re going to do one more scary thing. Set the camera to manual mode. Ready? Deep breath. OK, go.

Still with me? Great! Now, set your aperture to f/8, using whatever control your camera uses to change the aperture in manual mode. Now look through the viewfinder and press the shutter halfway. See the indicator on the meter? It’s probably way off to one side. Keep looking through the viewfinder while you turn whatever dial changes the shutter speed. Keep doing this until the indicator is right smack dab in the center of the scale. When you get it there, take the picture.

Guess what? You just took a photo in manual mode. If you view it on the camera’s LCD, you’ll probably see that it looks pretty good. Pretty cool, huh?

If your room isn’t very bright, there’s a chance that you couldn’t make that work. If so, set the aperture as wide as it will go and try again, or go somewhere with more light.

Next lesson: Shutter speed exercise

14 Comments

Filed under Aperture, Controls, Exercise, Exposure, shutter speed

How your camera works– exposure modes

ModeDialOK, this is what you’ve been waiting for… we’re about to take our camera out of automatic mode. How do we do that? It’s really very easy.

Somewhere on your camera there’s a dial that looks a little bit like this one on my 5D. It will have several settings to choose from, and may have many more than what’s shown in this photo. In order to set the exposure mode, you turn the dial so that the appropriate setting is lined up with the indicator line on the side. The line is a little bit hard to see in this photo, but the camera is in M mode. M is for manual, Magic, Master of the universe, and My favorite mode.

What are all those other modes?

  • Green box: the camera just does everything for me
  • P: program mode, which is much like the green box but a little less neurotic
  • Tv: shutter priority mode
  • Av: aperture priority mode
  • M: manual mode
  • B: bulb mode
  • C: custom function mode (which I’m going to ignore)

I shoot with Canon gear, and therefore I’m most familiar with Canon’s controls. Those are also the cameras that I have sitting around to use as examples. (If anybody wants to send me a Nikon so that they can have equal representation, I’d be happy to go the extra mile.) I believe that Nikon calls their controls Auto, P, S, A, and M for Automatic, Program, Shutter Priority, Aperture Priority, and Manual. Other brands will have very similar functions– if you can’t figure out what they are, consult your manual.

In Auto and P modes, the camera basically just does everything for you. Typically, Auto mode is extremely obsessive about it, and won’t let you change any of the settings on your own. P mode is kind of a laid back version of Auto, one that will set the shutter speed and aperture for you, but not ignore you if you try to change something else.

Aperture priority and shutter priority are the real workhorses, and many people find that they use aperture priority more than anything else. You might too, once you figure out how they work. In aperture priority mode, you pick your own aperture, and then the camera’s meter figures out what shutter speed to use. As you can probably guess, in shutter priority it’s just the opposite– you pick the shutter speed that you want, and then the camera picks an aperture. Pretty easy, huh?

Manual mode is the final mode that you might want to use on a regular basis. In manual mode, the camera keeps its grubby little paws off the settings, and you get to choose both the shutter speed and the aperture. That sounds like a scary amount of power, right? Well, it’s not so bad. The camera’s not going to do any work, but it will still give you information. Even in manual mode, the camera’s meter works just fine, and you can use the display to help you find the right exposure.

Just for completeness, bulb mode is a special manual mode. In bulb mode, you press the shutter button once to open the shutter, and press it again to stop. This seems like a weird thing to do, and you’re right, but it’s occasionally useful for things like taking pictures of stars. You’ll probably never need to use bulb mode, but tuck the information into a corner of your brain in case it ever comes in handy.l

You’re probably wondering how you set the aperture and shutter speed on your camera. Frankly, I have no idea but if you bring it over here I’ll figure it out and tell you. Or, you can grab the manual and look it up. Here’s how mine work:

Canon 5D: There’s a dial right behind the shutter button– it controls the shutter speed. There’s a thumb wheel on the back of the camera that controls the aperture.

Canon Digital Rebel XT: There’s a dial right behind the shutter button. In aperture priority mode, this button controls the aperture. In shutter priority button, it controls the shutter speed. In manual mode, that dial controls the shutter speed. In order to set the aperture in manual mode, you press the top button (labeled Av +/-) on the back of the camera and hold it down while turning the dial. Yes, that’s a little confusing to describe. It’s actually pretty easy to do, and once you get the hang of it you’ll find it quite easy.

Next up, our first exercise!

Next lesson: Exposure modes exercise

8 Comments

Filed under Controls, Lesson

How your camera works– the meter

This is part two of how your camera works, and it’s a little bit more complicated than the first round. I’ll try to keep it as simple as possible, but some of this is pretty close to magic.

As I explained earlier, when you take a picture the aperture closes down part of the way, the shutter opens, and then the sensor records the light it saw. There’s a step that happens before that, and it’s a very important one.

Your camera is surprisingly smart for such a small piece of gear, and it does a lot of sneaky stuff when you aren’t looking. You’ve probably noticed that if you leave the camera in automatic mode, it pretty much just figures out how to take a picture that looks pretty good. Sometimes it guesses wrong, but most of the time it gets pretty close to a good picture. How does that happen?

Your camera has a built-in light meter that measures how much light is coming into the camera. Just before you take a picture, when the shutter button is halfway down, the camera very quickly measures the light coming into the camera and then picks out the settings it thinks will be best for a good picture. If you’re in a dark bar, the camera will want the lens to be wide open and the shutter to be open for a long time. In bright daylight, the camera will want a smaller opening and a quick shutter speed so that the photo doesn’t get overexposed.

MeterIsHappyI’m sure you’ve seen the weird scale thing somewhere on your camera. There’s almost certainly one in your viewfinder, and quite possibly also one on a screen on the top or back of your camera. It usually has numbers that go from -2 to +2, with a bunch of tick marks in between and a line that moves around seemingly of its own volition. That thing is a display of your camera’s meter, and it’s really very simple to understand. The camera moves the line around to let you know if it thinks the shot is going to be underexposed, overexposed, or just right. When the line is right smack dab in the center, as it is in this photo, the camera is very happy about the exposure. That doesn’t mean the exposure will be perfect– cameras are far from perfect at guessing this stuff. They’re pretty good, though, and the camera’s meter will usually be a very good starting point.

If the line is to the right of center, that means the camera thinks that the shot will be over exposed– the photo will have too much light. A much more common situation is that the line will be way over on the far left, which means that there’s not enough light and the photo will be underexposed. In automatic modes, the camera will do its very best to get that line in the middle of the display, but sometimes it just won’t be able to even at the slowest shutter speed and the widest aperture. Later we’ll talk about ways of handling that. For now, just try to get more light if you can.

Modern cameras generally have very sophisticated meters with all sorts of different modes. You’ll often hear terms like spot, zone, center-weighted, evaluative, partial, super duper, whizbang, and confusing. Camera review sites will list the various modes as badges of honor, and gear geeks will discuss them ad nauseum.

Don’t worry about those for now, and just leave yours set to whatever the camera’s default is. Right now, all you really need to know about metering is that your camera knows how to measure light and pick out shutter speeds and apertures based on the light it sees.

OK, I’ll tell you just a little bit more. Your camera’s default mode is probably one where the middle of the picture matters a lot, the edges barely matter at all, and the stuff in-between matters a little bit. That’s because most people put the important stuff in the middle of the picture. Somewhere down the line we’ll talk about different metering modes and why you might care, but that’s pretty far away. It’s entirely possible that you’ll never have a reason to use anything but the camera’s default mode.

Next lesson: How your camera works– exposure modes

6 Comments

Filed under Controls, Lesson