Category Archives: Equipment

What is bracketing?

I wrote a little bit about bracketing earlier, but it’s an important concept and it deserves its own entry.

You’ll often hear photographers talk about bracketing an image. Bracketing sounds pretty technical, but it’s really just a fancy term for taking multiple shots of the same image at slightly different exposures. With some scenes, it’s really hard to know whether you’ve gotten the exposure right, and it’s worth taking a few extra shots to make sure one of them will be good.

Let’s say that you’re shooting a scene and the camera’s meter thinks that the right exposure is f/8 and 1/200 sec. Maybe it is, but maybe that will result in a little bit of underexposure or overexposure. If you wanted to bracket one stop on either side, you could take one shot at f/8 and 1/100 sec, one at f/8 and 1/200 sec, and one at f/8 and 1/400 sec. Alternately, you could take one at f/8 and 1/100 sec, one at f/5.6 and 1/100 sec, and one at f/11 and 1/100 sec. Either way, you’d wind up with three images and if the camera was anywhere close to being correct you probably will wind up with one perfectly-exposed image.

In the days of film, bracketing was often a necessary but expensive operation. Digital cameras have made it cheap to take multiple exposures, since there are no film developing costs. Flash cards are both cheap and reusable, and you can fit lots more images onto them than you could on a roll of film.

Bracketing sounds cool, but I bet it also sounds like a lot of work. Want me to make it easier for you? OK, piece of cake.

All modern dSLRs have a function called automatic exposure bracketing, or AEB. When you enable AEB, you tell the camera how large an increment you want to use, and then whenever you press the shutter the camera takes three images– one at what it thinks is the correct exposure, one underexposed by the amount you specified, and one overexposed by the same amount. Click click click. You can usually specify the size of the compensation in 1/3 or 1/4 stop increments up to two full stops, sometimes three

Look at the specifications for your camera, and you’ll see something that looks like this:

AEB: +/- 2.0 EV, 0.5 or 0.3 EV increments

That means that you can bracket plus or minus two full stops, and you can choose either 1/3 or 1/2 stop increments. EV means Exposure Value, and it basically means the combination of aperture and shutter speed for an exposure.

Voila! All you have to do is turn it on, and your camera will do the work for you. Consult your camera’s manual to figure out how to enable exposure bracketing on your camera.

In situations where the lighting is tricky, I highly recommend using aperture-priority or shutter-priority mode and then bracketing your shots. This will give you a much better chance at getting a perfectly-exposed image.

Now, go try it out! Put your camera into either aperture priority or shutter priority mode, and enable automatic exposure bracketing. Find something well-lit, and take a picture. You’ll hear three clicks of the shutter, and wind up with three images. (It’s like a buy-one get-two-free sale.)

For extra credit, put the camera in manual mode, set the aperture and shutter speed to what the camera thinks is the right exposure, and then manually take three shots, changing the shutter speed to bracket by one full stop. Look through the viewfinder and check the meter before each shot. For one it should be right in the center, for one it should be one stop to the left, and for the third it should be one stop to the right of center.

2 Comments

Filed under Controls, Equipment, Exposure

How To Clean Your Sensor

In Why are there spots on my picture? I showed several examples of sensor dust, and promised to tell you what to do about it. And then I procrastinated. No more! Here’s my simplified guide to cleaning your sensor.

Before I go very far, let me say this: whenever you clean your sensor, you run some risk of damaging it. If you’re careful and pay attention to what you’re doing that risk is very small, but if you’re not comfortable with the methods outlined here then you should take your camera to a reputable camera shop rather than doing it yourself. The author disclaims all responsibility for any damage you might do to your camera.

Have I scared you? Sorry about that. I’ll do my best to make you less scared. Some methods of cleaning the sensor are far safer than others, and those will do a good job on most dust. Occasionally you’ll wind up with really stubborn, sticky dust that can’t be removed without heavy artillery, but the vast majority of it is pretty wimpy and will go away when you tell it to.

Before we go on, there’s one tool that you’ll need for this project, and that’s some sort of a blower bulb. This is a small rubber gizmo that you will use to blast the pesky dust away from your sensor. The most popular one for this purpose is the Giottos Rocket Air Blaster, and I’m quite fond of mine. It’s powerful and works extremely well, and you get all of that wonderfulness for less than ten bucks. Another option is to go to the drugstore and pick up a bulb-style ear syringe. These cost a couple of bucks and will do a passable job, though the Giottos really is much better.

Before you attempt to clean your sensor, read your camera’s manual for instructions on sensor cleaning. My Canon manuals say to always have a fully-charged battery or have the camera plugged into an AC adapter when you clean the sensor. I don’t know much about Nikons or other dSLRs, but I’d imagine they’re the same.

Here’s a quick outline of what we’re going to do:

  • Figure out how to put your camera into cleaning mode
  • Take the lens off of the camera
  • Put the camera into sensor cleaning mode
  • Quickly blast the dust off of the sensor
  • Turn the camera off to get it out of cleaning mode
  • Put the lens back on

That doesn’t sound too hard, does it? OK, let’s go.

First off, read the manual and then look through your menus to see how to put the camera into sensor cleaning mode. You don’t want to put it into this mode yet, but you know where the setting is and be ready to go.

The next step is so obvious that it doesn’t require explanation– remove your lens. I make it a habit to always keep the opening of the camera body pointed down whenever I don’t have a lens on the camera– this utilizes an amazing force called gravity to help keep dust out of the camera. It probably doesn’t do all that much good, but every little bit helps.

Now, have your blower bulb handy, then put the camera into sensor cleaning mode. You should hear the mirror flip up so that the sensor is accessible.

Bulb CleaningHere comes the fun part: keep holding the camera so that it’s facing down, and use the blower bulb to blast air onto your sensor a few times. This should dislodge most of the dust that’s hanging around. If you keep the opening pointed down, that gravity stuff will help keep the dust from falling back onto the sensor. Work quickly, but don’t hurry… it’s better to have to repeat the process a second or third time than to work too fast and bump something you shouldn’t.

Now, turn the camera off to take it out of cleaning mode, or alternately do whatever your manual told you to do. Put the lens back on the camera so that you don’t let more dust in.

A few words of caution:

  • Be careful! You don’t want to touch anything with the tip of the blower.
  • Do this in as dust-free an environment as possible
  • Absolutely do not use compressed air for this– it contains propellants that you don’t want inside your camera

When you’re done, take another test shot and you should see that much of the dust is gone. You almost certainly won’t get all of it, but that’s OK– I don’t think I’ve ever had a completely dust-free sensor in my life. Small amounts of dust are impossible to see in most images, and when they do show up it’s almost always possible to get rid of them with a tiny amount of Photoshopping.

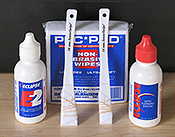
What if you have serious stuck-on dust that won’t go away? There are several methods at your disposal that require a bit more caution than a blower bulb but can remove even the most stubborn dust. Probably the best is wet cleaning. This is done with materials that are specially designed to avoid leaving residue on your sensor. (Please put that Windex down right now.) The kit I have is sold by Copper Hill Images, and I’ve been quite pleased with it. I do most of my cleaning with a blower bulb, and when that doesn’t work I resort to wet cleaning. Copper Hill has an excellent tutorial on using their products– it’s a bit chatty, but contains a lot of good information.

Another method that some people swear by is a specially-designed electrostatic brush. I personally haven’t had very good luck with cleaning brushes, but that may just be my incompetence with using them. Your mileage may vary.

The Dust-Aid kit is an interesting new product– it uses a special adhesive pad to clean the dust off of your sensor, sort of like a lint roller for your sensor. I haven’t used one yet, but I’ve heard mixed reviews. My guess is that they’ll be somewhat more thorough than a blower, and not quite as good as wet cleaning.

Sensor cleaning has been written about a lot, and everyone has an opinion about it. If you do a web search for “cleaning dslr sensor” you’ll find a lot of excellent advice and a wide variety of opinions. To my way of thinking, the blower bulb method is the least invasive and should always be tried before you go onto something more hardcore.

Many new cameras try to automatically clean the sensor by vibrating it every time the camera is turned on or off. I don’t have personal experience with those, but others have reported that camera self-cleaning will reduce the amount of dust you get, but won’t completely eliminate it. You’ll still need to clean your sensor by hand from time to time.

Do your best to prevent getting dust into your camera– always keep a lens or a body cap on the camera, and when you change lenses do it quickly with the camera pointing down, and in as clean an environment as possible. However, when the inevitable dust shows up and starts causing problems, it’s not the end of the world.

9 Comments

Filed under Equipment, Lesson

Why are there spots on my picture?

Dusty Flower You might notice it in the blue of the sky or the white of a wedding dress. Maybe, as often happens with me, it’s the petals of a flower. Whatever the image, someday you’re going to look closely at a picture and see that it’s full of little spots. These often look like little dark spots ringed by a color that’s slightly lighter than the background, and they show up in the same place on every picture you take.

These spots usually come from dust on your sensor. You won’t see them too often at large apertures, but when you stop the camera down they start to become visible. They particularly stand out in areas that have large expanses of a single light color, but you can often see them in other areas of the image as well.

This flower was taken at f/32, which as we all know is a very tiny f-stop. It’s not a great photo, but because of the small aperture it shows every little piece of dust on the sensor. You can’t really see it at the small size, but if you were to look at the full-resolution image you’d see lots and lots of little bitty spots all over the photo.

Sensor DustOn the right is a collection of full-size crops taken from the same image. These spots become highly-visible and quite annoying when the image is enlarged.

There’s an easy way to test to see if you have noise on your sensor. Find a brightly-lit white or light-colored wall, or a piece of plain white paper. Set your camera to manual mode, shutter speed of about two seconds, and the smallest aperture your lens will do. Point the camera at the white surface and take a picture, moving the camera around just a little bit so that the background becomes blurry.

Transfer the image to your computer and look at it full-size. Chances are good that you’ll see at least a few little specks, and if you’ve never cleaned your sensor before it may be pretty bad.
DustySensor

This image originally came from Flickr user djwudi, and I thank him for allowing me to use it. He works in a camera shop, and a customer came in complaining about spots on his photos. This is what the sensor looked like at f/32 before cleaning. I’ve personally never seen one this bad, but dust can start making your pictures ugly long before this point.

If you change lenses, and sometimes even if you don’t, getting dust on your sensor is inevitable. However, there are a few things you can do to reduce the amount of dust that your sensor collects:

  • Never store the camera without a lens or other protective cap
  • Minimize the number of times you change lenses, and minimize the amount of time the lens is off the camera
  • When you change lenses, make sure the body of the camera is pointed down and the camera is turned off
  • Try not to change lenses in dirty environments

My procedure for changing lenses is to turn the camera off (though sometimes I forget), then take the rear cap off of the new lens and get it ready to go. As soon as it is, I point the camera straight down, remove the lens, and put the new one on as quickly as possible. I then put the rear cap on the old lens and store it in my camera bag.

Do you have dust?  Don’t worry!  Here are SSA!’s instructions for cleaning your sensor.

5 Comments

Filed under Discussion, Equipment

What do lens terms mean?

If you’ve just gotten your first dSLR, you’ve probably already thought about buying another lens to go with it. Maybe you want something that will let you shoot telephoto, or wide angle, or macro. Maybe you want something faster. Most likely, you don’t know what you want, but somebody told you that the kit lens wasn’t very good and you believed them.

You did what anyone would do, and started surfing the web looking at lenses. Pretty soon, your head was swimming and your eyes were glazed over after looking at all those lens terms. What’s an EF-S? What does 70-200 mean? Why is that lens so much more expensive than the one that seems like the same thing?

I’ll do my best to unravel it all for you, though I’ll warn you up front that some of this is Canon-specific. If anyone wants to write a guest entry and explain Nikon-specific terminology, or terminology for other brands, leave me a comment.

Canon50mm First off, an easy one. The writing on the front reads “CANON LENS EF 50mm 1:1.8 II CANON INC. (theta)52mm”. This is the Canon “Nifty Fifty” 50mm lens. (It’s a steal at around $75, and I highly recommend picking one up if you shoot Canon.) The “CANON LENS” is easy enough that I won’t insult your intelligence by explaining it.

“EF” is a Canon-specific term, and it stands for Electro-Focus. This is the type of lens that is used on the Canon EOS line of SLRs. As of this writing, all digital SLRs are EOS-type cameras, so if you have a Canon dSLR any EF lens should work. Some lenses are EF-S rather than EF. The S stands for “sticks out in back” or something like that– the back part of the lens sticks out a little farther than an EF lens. If you have the Canon 18-55 kit lens, it’s an EF-S mount. EF-S lenses work on almost all Canon dSLRs except for the high-end professional models.

“50mm” is the focal length of the lens– I explained what focal length is in the previous entry. 50mm is kind of a mid-range focal length, neither long enough to be telephoto nor short enough to be wide-angle. It’s a good general-purpose length.

“1:1.8” is the maximum aperture of the lens– the widest that it can open. The term “1:1.8” means exactly the same thing as f/1.8, and we all know what f-stops are now, right? Right?

I’ll be perfectly honest here and say that I’m not certain what the “II” means, but I’m guessing it means something like “Version 2”.

On the other side of the lens it says “CANON INC.” and then “52mm”. That last number is the size of the filter threads. Almost all lenses have threads on the outside that will let you screw a filter onto the front, either to protect the front glass from damage or to add some sort of special effect. On this particular lens, the diameter of the threads is 52mm, which means that you need to buy a 52mm filter if you want to add a filter. It is common practice and a very good idea to keep a UV filter on the front of your lens at all time, to protect the lens from damage.

Canon18-55Here’s the Canon kit lens. It’s a lot like the previous one, but a little bit more complicated.

Notice that instead of “CANON LENS” it says “CANON ZOOM LENS”. The word zoom means that the lens can change its focal length. In the previous example, the 50mm lens was always 50mm and you couldn’t make the focal length any longer or shorter. In the case of a zoom lens, there’s an extra ring on the lens that lets you zoom in or out to get closer or farther away from your subject. In this case, if we look just a little bit farther on the lens, we’ll see “18-55mm”. That means that the lens can zoom out to be as wide as 18mm, or zoom in to get as close as 55mm. You can, of course, use any length in-between those as well. Zoom lenses are nice because they let you have a lot of flexibility in how the image looks without having to change to a different lens.

I’ve already explained the “EF-S” part, but I’ll remind you that it’s Canon-specific.

Now it gets interesting. The maximum aperture is listed as “1:3.5-1.5.6”. We already know that means f/3.5-f/5.6, but why would a lens have more than one number? As it turns out, zoom lenses are really nice to use, but they’re harder to make than fixed-focal-length (also called “prime”) lenses. Some zoom lenses have the same maximum aperture at both their shortest and longest focal lengths, but sometimes the maximum aperture changes. When you see two numbers, the first one is what the maximum aperture is when the lens is at its shortest focal length, and the second one is at its longest.

In this case, that means that when the lens is zoomed out to 18mm, the widest possible aperture is f/3.5. When it’s zoomed in to 55mm, the widest it can open is f/5.6. As you can probably guess, if you’re in the middle of that range the maximum aperture is somewhere between those two values.

Finally, this lens has 58mm filter threads.

There are a few more terms you’ll commonly see for Canon lenses. “USM” stands for ultrasonic motor, and specifically the motor that is used for focusing. All you really need to know is that USM lenses focus faster than their non-USM counterparts, and they’re quieter.

“IS” stands for image stabilization. This is a piece of real technical magic that helps get rid of camera shake on longer exposures. It can be extremely useful for getting shots where you can’t quite hold the camera steady enough to get a solid shot. It won’t help you with moving subjects, and it won’t do any good for very long exposures, but it’s great when there’s almost but not quite enough light. IS lenses are much more expensive than their non-IS counterparts, though.

And finally, some Canon lenses have the “L” designation. This stands for “Ludicrously Expensive.” OK, not really, but it might as well. Canon L lenses are their top-of-the-line professional models. They are generally the highest-quality lenses that Canon makes, but they come with a high price tag.

I hope that helps, at least a little. Again, if someone wants to guest author a similar article about Nikon or other brand lenses, leave me a comment.

13 Comments

Filed under Equipment

What is focal length?

It happens to most dSLR owners. You get the camera, and you’re thrilled with it, but you’re also awed and a wee bit afraid because the whole thing is just so confusing. It doesn’t take very long before someone tells you that the kit lens, the lens that usually comes with the camera, is a piece of garbage. This sends you off to the web to find a better lens, but there are all sorts of complicated and cryptic numbers and letters and symbols and the like. The whole thing is so bewildering that you just want to go to the drugstore and buy a disposable film camera.

Don’t fear! The cryptic numbers and letters that are used to describe lenses are really (mostly) pretty straightforward. If you’ve been reading this blog, you’ll probably find that you’re already familiar with most of the terms, so this won’t be too hard.

Before we start looking at lenses, there’s on term that I may not have explained yet– focal length. In a nutshell focal length is how long the lens is. It’s a little bit more complicated than that, of course, and the technical definition isn’t all that interesting, but there is really only one thing you need to know, and it’s really easy. The longer your lens is, the more the image is magnified.

Let’s say that you’re taking a picture of the tree in your yard, and there’s a bird perched on a branch. If you use a short lens, you’ll get the whole tree into the picture, and the bird will be a tiny little blob. If you use a long lens, you’ll just get the bird and the branch that he’s sitting on, and you’ll be able to tell that he’s a blue jay. If you have a really long lens, you’ll be able to see the worm in his mouth. Cool!

If you have a zoom lens, and you probably do, you’re probably already familiar with this concept. Zoom in and everything gets closer. Zoom out and you get more of the area in the picture.

Polar Bear by Joe DeckerLong lenses are called telephoto lenses. The prefix tele- means distant, so telephoto lenses let you take pictures of distant things. This amazing shot of a polar bear, taken by award-winning nature photographer Joe Decker, was taken with a telephoto lens. Joe’s a smart guy, and he knows if he gets too close to a bear he runs the risk of being dinner.

Bryce Canyon Sunrise by Joe DeckerShort lenses are called wide-angle lenses, because they let you get a really wide view of your surroundings. Again, I’ll use one of Joe’s photos, this one a sweeping view of sunrise in Bryce Canyon. I honestly don’t know what lens was used for this shot, but the only way to get such a grand vista is to use a wide-angle lens.

Here’s what you should remember about focal length: using a wide-angle lens is like stepping back from the picture so that you can see more of the action, while using a telephoto lens is like walking over to the subject so you can get a closer look. That’s really all you need to know for now.

Once again, I’d like to thank Joe Decker for giving me permission to use his images as examples. I highly recommend checking out his work, especially some of his recent images from Iceland and Greenland.

In the next lesson, I’ll take a closer look at a couple of lenses and explain what all of the numbers mean.

Leave a comment

Filed under Equipment, Lesson