Category Archives: Autofocus

Autofocus and Portraits

I want to talk specifically about autofocus when shooting portraits. To start off, let’s go back to the teddy bear portrait studio that I set up recently and look at a couple of example shots.

NoseFocus_f2

EyeFocus_f2

If you’re like most people, you’ll perceive the second image as being better than the first… the first one will probably seem like it’s not quite right, even if you can’t put your finger on why. Since this is an essay about focus, though, you probably spotted the difference pretty quickly– in the first image, the bear’s eyes are slightly out of focus, while in the second one they’re sharp.

As I mentioned earlier, shooting portraits can be tricky when you’re using your camera’s autofocus. Portraits are often shot with a fairly shallow depth of field, since you want your viewer’s attention to be on your subject and not on the godawful tiger-striped background that you’ve posed them against. (Again, don’t do that.) It’s extremely important that the subject’s eyes be in focus for portraits, because… well, because I said so and because every other photographer does too.

Here are a couple of closeups that illustrate the difference in my bear images.

NoseFocus_eye EyeFocus_eye

In the image on the left, the nose is in clear focus, but the eye is blurry. On the right, the eye is in sharp focus but the nose is a little bit soft. Why the difference?

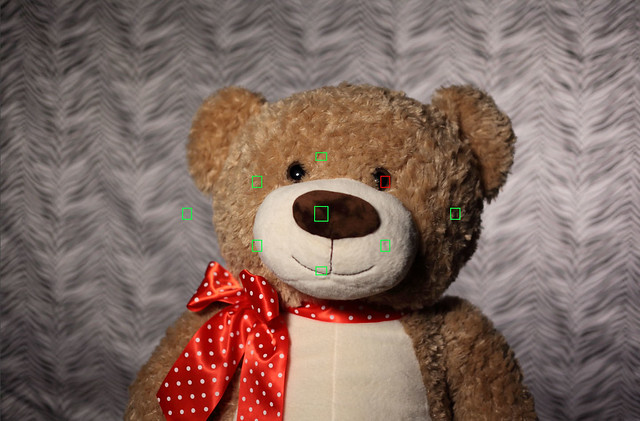
In the first image, I just let the camera pick its own focus point. It naturally gravitated toward the center of the image, found a nose that it could grab onto, and used that as the focus point. That’s great if you happen to have a weird fetish for noses, but it’s not great for portraits. In the second image, I told the camera that I wanted to use a specific autofocus point only, and then plunked that focus point right on the bear’s eye. Voila! I got exactly the shot I wanted.

If you can put a focus point right on one of your subject’s eyes, then do that. Some cameras have only one or a few autofocus points. Others, mostly high-end cameras, have eleventy billion of them scattered across the image. (IF you want to see this carried to an extreme, check out the 61 autofocus points on the Canon 5D Mark III. Also, if you’d like to give me one I will be happy to put each and every one of those autofocus points to good use.) As always, check your camera’s manual to figure out how to choose individual focus points, as the controls can vary quite a bit between manufacturers and even between different cameras from the same manufacturer.

If you can’t find an autofocus point that works, then you’ll just have to resort to manual focus. By now you probably know that it’s not so scary. Just flip the camera into manual focus mode, then turn the dial until you get what you want.

Thus endeth my wisdom about focusing for shooting portraits. I have one other topic to cover before I put autofocus to bed, but I’ll save that for another day.

Leave a comment

Filed under Autofocus, Lesson

What to do when autofocus deserts you

You’ve framed your image. You’ve pressed the shutter button and taken the shot. You quickly review the image on the camera and find out that your subject is horribly out of focus. What do you do? You have a few different tools at your disposal for showing the camera that you’re the boss of it, and different ones are useful in different situations.

50mm f/1.8 Manual Focus The first thing you can do is switch to manual focus mode. That’s probably really obvious, but if you’re in the habit of relying on autofocus for everything it might not occur to you that you can do it yourself. Flip the lens or camera into manual-focus mode (depending upon your camera), then grab the focus ring and twist it until you get exactly what you want. If you’re using a zoom lens you might find yourself habitually grabbing for the zoom ring rather than the focus ring, but practice a few times and you’ll eventually start getting the right one automatically.

The advantage of manual focus is that you’re in complete control of the focus. The downside is that it’s sometimes hard to tell when your image is precisely in focus. This is especially true with cropped-sensor cameras that have smaller viewfinders. Many cameras will light up a focus point when that part of the image is in focus even when you’re using manual focus, so you might be able to use that as a guide.

If your image is static, you can use the camera’s LCD as an assistant. Focus, take a shot, then view the image on your camera’s LCD screen. Zoom in on it and scroll around to see if the right parts of it are in focus. If not, correct the focus and try again. (In a competition between film and digital, film would lose hard on this point.)

Many lenses have distance scales on the barrel. If you know that your subject is six feet away from the camera then just turn the focusing ring on the lens until it’s focused at a distance of six feet. Voila!

The second thing that you can do is to use autofocus, but give your camera some extra guidance about what to focus on. Almost all cameras will let you choose one specific autofocus point rather than letting the camera pick its own. If you’re shooting a portrait, for example, you could choose an autofocus point that’s right over one of the model’s eyes. If you do that and the camera can find focus, then you’ll probably get the shot that you’re looking for.

Consult your camera’s manual for specifics of how to choose a focus point, since this can vary quite a bit between makes and models.

There’s a third strategy that will work well in some situations, but it’s a little bit tricky and doesn’t always get what you’re looking for. It’s called focus and recompose.

Imagine that you’re shooting an image with your subject in the bottom right corner of the frame, and your camera won’t focus on it naturally. With focus and recompose you point your camera directly at your subject, then press the shutter button halfway down so that the camera focuses on your subject. Keep holding the shutter button down while you move the camera back to the composition that you want, then take the picture.

Sometimes this works. It will probably do OK if you’re using a narrow aperture and therefore have a lot of depth of field. If you’re shooting a portrait, or shooting with the lens wide open, you probably won’t get what you’re looking for. Explaining why this is would require you to remember some of your high school geometry and do some math, so I won’t explain the details here. The short answer is that when you move the camera you’re changing the distance to your subject ever so slightly, and that might be enough to make your subject go out of focus.

And there you go– you now have three tricks that you can use for showing your camera who’s boss when you’re trying to focus. I recommend that you go practice each of them, so that you’ll have them ready to go the next time your camera gets some crazy ideas about what to focus on.

Leave a comment

Filed under Autofocus, Lesson

When is autofocus likely to get it wrong?

Most of the time, autofocus will do a really good job of getting your subject in focus. Even though I never put my camera in green box mode anymore, I usually leave autofocus on. I keep an eye on it, though, just to make sure that it’s doing what I want. This is especially true in tricky situations where autofocus might not be smart enough to get me the results I’m looking for.

Here are some situations where just blindly autofocusing might not be your best bet.

Medium f/2

You’re shooting through a fence or other foreground object. If there’s something in the foreground with strong lines, such as a fence, your camera is likely to focus on the foreground object rather than your chosen subject. In this example I’ve manually focused on the container and blurred the fence, but if I’d left it up to the camera I probably would have had a sharp fence and a fuzzy shipping container.

Pistil

Macrophotography. Macrophotography is challenging because you have razor-thin depth of field, so you have to pay careful attention to what parts of the image you want to have in focus. If you let the camera pick out what it wants to focus on, it will probably guess wrong. Serious macrophotographers generally use manual focus for everything.

Copyright Joe Decker, used with permission.

Everything in your image is soft. When everything in your image is cloaked in fog, your camera might not be able to find anything to focus on. This beautiful image from award-winning nature photographer Joe Decker is titled Tree Ballet and Pogonip, and is an excellent illustration of the foggy, soft image. This image is from his series Mono in Winter. See more of Joe’s work at Rock Slide Photography.

Your subject is extremely off-center. Again in Joe’s image, even if the trees hadn’t been shrouded in fog the camera might not be able to focus on them. Autofocus systems tend to be heavily weighted toward the center of the image. If you stick your subject way off in a corner then your camera is probably going to lose this particular game of hide-and-seek.

NoseFocus_f2

You’re shooting portraits. Portraits are often shot with shallow depth of field, but the subject’s eyes should always be in focus. It’s OK for the subject’s nose to be a little bit soft, and the ears can be downright blurry, but the eyes had better be crisp. If you let autofocus have its way then it might decide that it really wants the ears or the shirt or the background to be sharp, and leave the eyes shrouded in some of Joe’s mist. In this particular example, the camera got overly enthusiastic about the sharpness of the bear’s nose.

You’re shooting in low light. Autofocus often has a horrible time finding focus if you’re shooting in very low light. If you can’t see very well, your camera probably can’t either.

Those are some of the key situations where just trusting your camera to get the focus right might not be the best idea. In the next lesson we’ll see what we can do about autofocus problems.

1 Comment

Filed under Autofocus, Lesson

Exercise: Autofocus

Let’s play with our autofocus for a bit to get a feel for how it behaves. To start with, make sure your camera is set to use all of the autofocus points. If you’ve never changed this from the default, you should already have this set up. If you need to change this, consult your camera’s manual for specifics.

First exercise: Find an object that’s maybe three or four feet away from you, has sharp edges, and is reasonably well-lit. Turn the autofocus ring on your lens all the way to one extreme, so that you’re either focused on infinity or as close as your lens will go. Point the camera at the object, look through the viewfinder, and press the shutter button halfway. You should hear the lens whir, and you’ll see the object pop into focus. Pay attention to which of the autofocus points lights up. Now turn the viewfinder all the way to the other extreme and do it again.

Try this with faraway objects and nearby ones until you get bored with it.

Second exercise: Find a well-lit, solid-colored wall. Point the camera at it so that you have nothing else in the viewfinder besides the wall. Press the shutter button halfway and see if you can focus. You might be able to, but chances are pretty good that the camera will try for a while and then give up.

Third exercise: Find a piece of paper with some text on it, and put it somewhere with a decent amount of light. Alternately, you can use your computer screen. Get up close, so that the lens is only a couple of inches away from the print, then push the shutter button to try to focus. You probably won’t be able to. Pull back a couple of inches, and try again. Keep backing up a couple of inches at a time until the lens is able to focus.

So what did we learn?

In the first exercise, you watched the camera focus. Some lenses focus so quickly that you can barely see it happening. Other lenses are much slower and will take a significant fraction of a second to find focus. You got to see which autofocus points the camera used for different situations.

In the second exercise, the camera probably couldn’t find focus. If there were no surface details, the camera wouldn’t be able to find any edges, and therefore it wouldn’t be able to focus. The period of time when the lens was searching for something to focus on is called focus hunting.

Even one small feature like a nail hole on the wall would probably be enough for the camera to focus on.

In the third exercise, you found the minimum focusing distance of your lens. Every lens has a minimum distance at which it can focus, and if you try to focus on something closer it won’t work. Some lenses, especially macro lenses, can focus very very close. Others may require you to be a couple of feet away from your subject. The minimum focusing distance is probably written on the barrel of the lens.

I did this exercise with the Canon 50mm f/1.8 “nifty fifty” lens, which has a minimum focusing distance of 1.5 feet. My most extreme lens, the Canon MP-E 65mm macro lens, has a minimum focusing distance of around one inch. Sometimes a lens will have more than one minimum distance, and a switch that will let you control it– this is called a focus limiter. The Canon 70-200mm f/4L IS lens, my usual telephoto lens, can be set to either 1.2 meters or 3 meters. A focus limiter lets you help the camera focus more accurately by limiting the range at which the camera and lens try to focus. You don’t really need a focus limiter, but in some situations it can be a useful tool.

Now, go out and play! If you have more than one lens, try them all. Try focusing in a very dark room. Try focusing on something that’s not in the center of the image. Make up your own experiments and get a feel for how your equipment works. In our next lesson we’ll use this knowledge to help you focus in challenging situations.

Leave a comment

Filed under Autofocus, Exercise

How Autofocus Works, a really simple explanation

In my last article, I posted this photo and asked you to identify what’s wrong with it:

IMG_3750

As it turns out, this is actually a really easy question to answer– the background of the photo is in focus, but the bear isn’t. Now, I’ll be the first to admit that teddy bears are supposed to be fuzzy, but this isn’t the kind of fuzziness that most people have in mind. The more interesting question here is why the camera got the wrong thing in focus. In order to do that, we have to learn a little bit about how autofocus works.

Before we do that, let’s try a little mini-exercise. Pick up your camera. Look through the viewfinder, point it at any interesting subject and press the shutter button halfway. You’ll probably see a display with a bunch of black boxes and some red ones. In this image I’ve colored the black focus points green so that you can see them better. Your camera might only have a few little boxes or it might have lots and lots of them. Those little boxes are called autofocus points:

EyeFocus_focuspoints

So how does autofocus work? It’s a complicated, highly-technical thing, but here’s the simplified one-paragraph version that will tell you most of what you need to know.

When you use autofocus to take a picture, the camera looks at each of the autofocus points and looks for areas of sharp contrast. The camera then changes the focus on the lens just a little bit and checks those points again to see if the contrast is better or worse. It keeps doing this, adjusting the focus a tiny bit each time, until it thinks it has the best focus. Once it does, it takes the picture. There’s a whole lot of black magic going on behind the scenes to make this happen, but that’s the really simple version.

The camera might choose to use all of the focus points if it can. More often, it will use one or a few of them to find the subject. As you’re looking through the viewfinder, the camera will light up an individual focus point if it’s happy with the focus in that area. If your camera is guessing wrong you can boss it around and tell it exactly which points to use, but that’s a subject for a different lesson.

So that’s it– when you autofocus, the camera looks at the areas in the little black boxes and then changes the focus on the lens until it’s happy with the results. That’s not so hard, is it?

2 Comments

Filed under Autofocus, Lesson

When Autofocus Goes Bad

[It’s been a while since I updated Stop Shooting Auto! Too long, in fact. It’s time for me to get back to work, starting now.]

Thus far I’ve written a lot about the things that go into exposure– aperture, shutter speed, ISO. By now you should know a lot about how these things work, what your camera does automatically, and ways that you can be smarter than your camera. If you’re not comfortable with these things yet, go back through the exposure lessons and brush up on the things you’re missing. In particular, at this point you want to have a good handle on aperture and depth of field.

Exposure isn’t the only thing that your camera does automatically though. In almost all circumstances, your camera will also automatically focus for you. This is often a good and wonderful thing, since it makes your life easier, but sometimes the camera gets autofocus wrong. Let’s look at an example.

IMG_3750

This evening I decided to set up the Stop Shooting Auto! Bear Portrait Studio and take some shots. Shooting bears is great for practicing your photographic skills because they’re eminently patient with you and won’t squirm around, fall asleep, or wander off to grab a beer from the ‘fridge.

The setup for the bear portrait studio is pretty straightforward. There’s an extra super ugly backdrop, which in this case is a really tacky sheet hanging from a backdrop stand. In front of that is a bear sitting in a chair. I have a few cheap incandescent lights set up, with two pointed at the backdrop and one on the bear. Finally, the camera is mounted on a tripod. For this example, the camera’s sensor is just under eight feet away from the backdrop. The bear’s eyes are 51 inches from the backdrop. The bear has quite the schnozz on him, as the tip of his nose is four inches in front of his eyes.

(My ethical standards require me to make the following disclaimer: Using a zebra print sheet for a backdrop is a profoundly bad idea, and you shouldn’t do that. Doing so may cause permanent damage to your retinas, or your psyche. Sometimes I think my purpose in life is to serve as a warning for others.)

I’m shooting with a Canon 5D Mark II, and a 50mm f/1.8 lens at f/4.

So, with this setup I took a portrait. Something went horribly wrong, though– the image sucks. Can you guess what the problem was? Click on the image if you want to see larger versions of it.

2 Comments

Filed under Autofocus, Introduction, Lesson