f/8 and Be There

IMG_1088

There’s an old saying among photojournalists– f/8 and be there. Sometimes the technical details of a photograph really matter, and sometimes they don’t. Perfect technique won’t help you if you don’t have your camera ready to go when the moment happens.

As you may have heard, the Olympic torch made an appearance in San Francisco today. In fact, it was scheduled to pass just a block from my office. I normally just hop in the car and drive to work, but I was worried that parking would be expensive and the neighborhood would be a zoo, so I opted for public transit. I took the ferry across the bay to San Francisco (and snapped some fun pictures, but accidentally erased them… I don’t function well in the morning), and encountered lots of protesters near the ferry building.

I knew this was likely, so I already had the camera ready to go. In particular, I put the camera in aperture priority mode, set the aperture to f/8, picked a lens that I was happy with, and made sure that autofocus and image stabilization were turned on. f/8 is the perfect middle-of-the-road aperture, since it will give you enough depth of field to compensate for minor focus mistakes, and will let in enough light to get decent shutter speed in daylight.  I also put the camera in multiple shot mode, so that if something was changing quickly I could just hold down the shutter button and hopefully get one of the shots timed perfectly.

Later in the day, I increased the ISO to 400– I was shooting a lot of stuff that was in shadows, and I wanted to make sure I had plenty of latitude in my shutter speed.

(I made one mistake in camera settings, but I was able to work around it OK. Can you spot what it was?  It’s hiding in the photo’s exif data.)

By spending a little bit of time up-front thinking about how I would be shooting, I was able to just forget about the mechanics of the camera and pay attention to what I wanted to shoot.  The picture above is one that I almost got right, but not quite… if only the bloody video guy hadn’t walked in front of me just as I pressed the shutter button.  Still, if I didn’t tell you that you might think he was another protester, and I’d almost be off the hook.

When shooting fast is really important, think about your camera settings in advance and figure out what you need in order to be able to forget about them.  In typical broad daylight shots, that’s probably aperture priority mode and f/8.

5 Comments

Filed under Aperture, Controls, Equipment

What is bracketing?

I wrote a little bit about bracketing earlier, but it’s an important concept and it deserves its own entry.

You’ll often hear photographers talk about bracketing an image. Bracketing sounds pretty technical, but it’s really just a fancy term for taking multiple shots of the same image at slightly different exposures. With some scenes, it’s really hard to know whether you’ve gotten the exposure right, and it’s worth taking a few extra shots to make sure one of them will be good.

Let’s say that you’re shooting a scene and the camera’s meter thinks that the right exposure is f/8 and 1/200 sec. Maybe it is, but maybe that will result in a little bit of underexposure or overexposure. If you wanted to bracket one stop on either side, you could take one shot at f/8 and 1/100 sec, one at f/8 and 1/200 sec, and one at f/8 and 1/400 sec. Alternately, you could take one at f/8 and 1/100 sec, one at f/5.6 and 1/100 sec, and one at f/11 and 1/100 sec. Either way, you’d wind up with three images and if the camera was anywhere close to being correct you probably will wind up with one perfectly-exposed image.

In the days of film, bracketing was often a necessary but expensive operation. Digital cameras have made it cheap to take multiple exposures, since there are no film developing costs. Flash cards are both cheap and reusable, and you can fit lots more images onto them than you could on a roll of film.

Bracketing sounds cool, but I bet it also sounds like a lot of work. Want me to make it easier for you? OK, piece of cake.

All modern dSLRs have a function called automatic exposure bracketing, or AEB. When you enable AEB, you tell the camera how large an increment you want to use, and then whenever you press the shutter the camera takes three images– one at what it thinks is the correct exposure, one underexposed by the amount you specified, and one overexposed by the same amount. Click click click. You can usually specify the size of the compensation in 1/3 or 1/4 stop increments up to two full stops, sometimes three

Look at the specifications for your camera, and you’ll see something that looks like this:

AEB: +/- 2.0 EV, 0.5 or 0.3 EV increments

That means that you can bracket plus or minus two full stops, and you can choose either 1/3 or 1/2 stop increments. EV means Exposure Value, and it basically means the combination of aperture and shutter speed for an exposure.

Voila! All you have to do is turn it on, and your camera will do the work for you. Consult your camera’s manual to figure out how to enable exposure bracketing on your camera.

In situations where the lighting is tricky, I highly recommend using aperture-priority or shutter-priority mode and then bracketing your shots. This will give you a much better chance at getting a perfectly-exposed image.

Now, go try it out! Put your camera into either aperture priority or shutter priority mode, and enable automatic exposure bracketing. Find something well-lit, and take a picture. You’ll hear three clicks of the shutter, and wind up with three images. (It’s like a buy-one get-two-free sale.)

For extra credit, put the camera in manual mode, set the aperture and shutter speed to what the camera thinks is the right exposure, and then manually take three shots, changing the shutter speed to bracket by one full stop. Look through the viewfinder and check the meter before each shot. For one it should be right in the center, for one it should be one stop to the left, and for the third it should be one stop to the right of center.

2 Comments

Filed under Controls, Equipment, Exposure

How To Clean Your Sensor

In Why are there spots on my picture? I showed several examples of sensor dust, and promised to tell you what to do about it. And then I procrastinated. No more! Here’s my simplified guide to cleaning your sensor.

Before I go very far, let me say this: whenever you clean your sensor, you run some risk of damaging it. If you’re careful and pay attention to what you’re doing that risk is very small, but if you’re not comfortable with the methods outlined here then you should take your camera to a reputable camera shop rather than doing it yourself. The author disclaims all responsibility for any damage you might do to your camera.

Have I scared you? Sorry about that. I’ll do my best to make you less scared. Some methods of cleaning the sensor are far safer than others, and those will do a good job on most dust. Occasionally you’ll wind up with really stubborn, sticky dust that can’t be removed without heavy artillery, but the vast majority of it is pretty wimpy and will go away when you tell it to.

Before we go on, there’s one tool that you’ll need for this project, and that’s some sort of a blower bulb. This is a small rubber gizmo that you will use to blast the pesky dust away from your sensor. The most popular one for this purpose is the Giottos Rocket Air Blaster, and I’m quite fond of mine. It’s powerful and works extremely well, and you get all of that wonderfulness for less than ten bucks. Another option is to go to the drugstore and pick up a bulb-style ear syringe. These cost a couple of bucks and will do a passable job, though the Giottos really is much better.

Before you attempt to clean your sensor, read your camera’s manual for instructions on sensor cleaning. My Canon manuals say to always have a fully-charged battery or have the camera plugged into an AC adapter when you clean the sensor. I don’t know much about Nikons or other dSLRs, but I’d imagine they’re the same.

Here’s a quick outline of what we’re going to do:

  • Figure out how to put your camera into cleaning mode
  • Take the lens off of the camera
  • Put the camera into sensor cleaning mode
  • Quickly blast the dust off of the sensor
  • Turn the camera off to get it out of cleaning mode
  • Put the lens back on

That doesn’t sound too hard, does it? OK, let’s go.

First off, read the manual and then look through your menus to see how to put the camera into sensor cleaning mode. You don’t want to put it into this mode yet, but you know where the setting is and be ready to go.

The next step is so obvious that it doesn’t require explanation– remove your lens. I make it a habit to always keep the opening of the camera body pointed down whenever I don’t have a lens on the camera– this utilizes an amazing force called gravity to help keep dust out of the camera. It probably doesn’t do all that much good, but every little bit helps.

Now, have your blower bulb handy, then put the camera into sensor cleaning mode. You should hear the mirror flip up so that the sensor is accessible.

Bulb CleaningHere comes the fun part: keep holding the camera so that it’s facing down, and use the blower bulb to blast air onto your sensor a few times. This should dislodge most of the dust that’s hanging around. If you keep the opening pointed down, that gravity stuff will help keep the dust from falling back onto the sensor. Work quickly, but don’t hurry… it’s better to have to repeat the process a second or third time than to work too fast and bump something you shouldn’t.

Now, turn the camera off to take it out of cleaning mode, or alternately do whatever your manual told you to do. Put the lens back on the camera so that you don’t let more dust in.

A few words of caution:

  • Be careful! You don’t want to touch anything with the tip of the blower.
  • Do this in as dust-free an environment as possible
  • Absolutely do not use compressed air for this– it contains propellants that you don’t want inside your camera

When you’re done, take another test shot and you should see that much of the dust is gone. You almost certainly won’t get all of it, but that’s OK– I don’t think I’ve ever had a completely dust-free sensor in my life. Small amounts of dust are impossible to see in most images, and when they do show up it’s almost always possible to get rid of them with a tiny amount of Photoshopping.

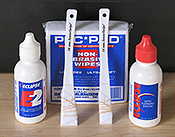
What if you have serious stuck-on dust that won’t go away? There are several methods at your disposal that require a bit more caution than a blower bulb but can remove even the most stubborn dust. Probably the best is wet cleaning. This is done with materials that are specially designed to avoid leaving residue on your sensor. (Please put that Windex down right now.) The kit I have is sold by Copper Hill Images, and I’ve been quite pleased with it. I do most of my cleaning with a blower bulb, and when that doesn’t work I resort to wet cleaning. Copper Hill has an excellent tutorial on using their products– it’s a bit chatty, but contains a lot of good information.

Another method that some people swear by is a specially-designed electrostatic brush. I personally haven’t had very good luck with cleaning brushes, but that may just be my incompetence with using them. Your mileage may vary.

The Dust-Aid kit is an interesting new product– it uses a special adhesive pad to clean the dust off of your sensor, sort of like a lint roller for your sensor. I haven’t used one yet, but I’ve heard mixed reviews. My guess is that they’ll be somewhat more thorough than a blower, and not quite as good as wet cleaning.

Sensor cleaning has been written about a lot, and everyone has an opinion about it. If you do a web search for “cleaning dslr sensor” you’ll find a lot of excellent advice and a wide variety of opinions. To my way of thinking, the blower bulb method is the least invasive and should always be tried before you go onto something more hardcore.

Many new cameras try to automatically clean the sensor by vibrating it every time the camera is turned on or off. I don’t have personal experience with those, but others have reported that camera self-cleaning will reduce the amount of dust you get, but won’t completely eliminate it. You’ll still need to clean your sensor by hand from time to time.

Do your best to prevent getting dust into your camera– always keep a lens or a body cap on the camera, and when you change lenses do it quickly with the camera pointing down, and in as clean an environment as possible. However, when the inevitable dust shows up and starts causing problems, it’s not the end of the world.

9 Comments

Filed under Equipment, Lesson

Homework: a reprieve!

All of you slackers and procrastinators have lucked out.  I don’t have much free time until this weekend, so you have until the end of Friday to do your homework.  You guys have posted some really cool images… I’m impressed!  This weekend I’ll be going through the entries and finding a winner or winners.

After that I’ll post a new assignment for April.

Leave a comment

Filed under Exercise

Hey, where’s your homework?

Hey you… yes you! Where’s your homework? Remember the homework assignment I gave you that’s due by the end of the month? Some of you have done it, and done quite a fine job, but the rest are still slacking. No, the dog dd not eat your memory card, and I won’t take a note from your mother.

If you need to review, here are some lessons that might help you:

And if you want to go through all of the lessons, walk through Exposure Lessons, in order.

Now go out there and do your homework. I don’t want to have to give you detention. Be sure to leave a comment on the homework entry with a link to your photo(s), along with exposure details and anything else you want to say about them.

3 Comments

Filed under Aperture, Exercise

A really cool utility!

I found this site while browsing a Flickr discussion today.  It’s a camera simulator that lets you look at a high-light, medium-light, and low-light scene and then tweak the aperture, shutter speed, and ISO to see how the photo will change.  You can put the camera into aperture priority, shutter priority, and manual modes and tweak all of the controls.  (There are also a couple of other modes available– program and automatic– but they aren’t interesting to us anymore, are they?)  There’s also a setting for exposure compensation, which we haven’t talked about before but is used for telling the camera to intentionally under- or overexpose a shot by a certain amount.

Check it out.

And when you’re done, grab your camera and try doing the same thing.

1 Comment

Filed under Exposure

Two interesting photos

I’m a big fan of the Day in Pictures on SFGate — the photos are generally quite interesting, they’re well-captioned, and the editor likes to play amusing games with proximity.

Today’s set had two photos that are excellent illustrations of the things you can do if you understand exposure. This one shows an elderly man praying in the middle of the road, with cars whizzing by on either side of him. The blur of the cars is worrisome– you’re sure he’s going to get hit at any moment– but it shows his conviction.

The second one shows a landscape with a closeup of poppies in the foreground. The poppies are crisp and sharp, and the background is reasonably sharp as well.

Take a moment to think about how you might shoot those two photos.

Got it? OK, here’s my take.

The first one requires a slow shutter speed in order to capture the motion of the cars. If we look closely, we can see that everything is sharp as far as the eye can see. This suggests that the photographer used a very narrow aperture and a slow shutter speed, and probably a low ISO as well. We don’t know how fast the cars are moving, but let’s guess, oh, 30MPH. We can ask Google and find out that’s 44 feet per second. I’d guess that the shutter speed was somewhere between 1/2 second and 1 second. I’d guess that the photographer also used a neutral density filter (something I haven’t talked about, but it’s basically a piece of grey glass that reduces the light coming into the camera) to get a slower shutter speed.

The poppies were clearly shot at a fairly small aperture, since the background was mostly in focus. The shutter speed is indeterminate, but was probably “whatever it takes”.

Whenever you see an interesting and unusual picture, take a minute to see if you can figure out what the photographer did to get it. This is excellent practice for figuring out your own shots when you’re trying to get a specific effect.

1 Comment

Filed under Discussion, Exposure

Why are there spots on my picture?

Dusty Flower You might notice it in the blue of the sky or the white of a wedding dress. Maybe, as often happens with me, it’s the petals of a flower. Whatever the image, someday you’re going to look closely at a picture and see that it’s full of little spots. These often look like little dark spots ringed by a color that’s slightly lighter than the background, and they show up in the same place on every picture you take.

These spots usually come from dust on your sensor. You won’t see them too often at large apertures, but when you stop the camera down they start to become visible. They particularly stand out in areas that have large expanses of a single light color, but you can often see them in other areas of the image as well.

This flower was taken at f/32, which as we all know is a very tiny f-stop. It’s not a great photo, but because of the small aperture it shows every little piece of dust on the sensor. You can’t really see it at the small size, but if you were to look at the full-resolution image you’d see lots and lots of little bitty spots all over the photo.

Sensor DustOn the right is a collection of full-size crops taken from the same image. These spots become highly-visible and quite annoying when the image is enlarged.

There’s an easy way to test to see if you have noise on your sensor. Find a brightly-lit white or light-colored wall, or a piece of plain white paper. Set your camera to manual mode, shutter speed of about two seconds, and the smallest aperture your lens will do. Point the camera at the white surface and take a picture, moving the camera around just a little bit so that the background becomes blurry.

Transfer the image to your computer and look at it full-size. Chances are good that you’ll see at least a few little specks, and if you’ve never cleaned your sensor before it may be pretty bad.
DustySensor

This image originally came from Flickr user djwudi, and I thank him for allowing me to use it. He works in a camera shop, and a customer came in complaining about spots on his photos. This is what the sensor looked like at f/32 before cleaning. I’ve personally never seen one this bad, but dust can start making your pictures ugly long before this point.

If you change lenses, and sometimes even if you don’t, getting dust on your sensor is inevitable. However, there are a few things you can do to reduce the amount of dust that your sensor collects:

  • Never store the camera without a lens or other protective cap
  • Minimize the number of times you change lenses, and minimize the amount of time the lens is off the camera
  • When you change lenses, make sure the body of the camera is pointed down and the camera is turned off
  • Try not to change lenses in dirty environments

My procedure for changing lenses is to turn the camera off (though sometimes I forget), then take the rear cap off of the new lens and get it ready to go. As soon as it is, I point the camera straight down, remove the lens, and put the new one on as quickly as possible. I then put the rear cap on the old lens and store it in my camera bag.

Do you have dust?  Don’t worry!  Here are SSA!’s instructions for cleaning your sensor.

5 Comments

Filed under Discussion, Equipment

Homework Assignment… with a prize!

flower f/4

April 4, 2008 @12 a.m:  The contest is now closed.  You’re still welcome to do the exercise and add your photos to the comments, of course, but you won’t be eligible for the March prize.

OK all you slackers… you have homework. Grab your cameras.

Go outside on a bright sunny day, or somewhere where you’ll have lots of light to work with. Find a subject. I don’t care what it is– a person, a tree, a flower, a fire hydrant– and a background. The only criterion is that the subject is clearly distinct from the background.

Take a picture of your subject in such a way that the background is intentionally blurred. You can use aperture priority, shutter priority, or manual modes at your discretion, though of course one of those is less-suited to this exercise than the others. Don’t just shoot a bunch and hope you get it right, but think about what settings you want to use before you take the shot.

Upload your photo to a photo sharing site (I recommend Flickr but any one will do). Leave a comment with the settings that you used, a link to your photo, and anything else you want to say about the image.

At the end of March 2008, I’ll pick one commenter at random and send them an 8×12 signed print from my flower porn collection.

OK, go out there and shoot!

Update! At a friend’s suggestion, I’m offering two prizes. If at least 20 people submit entries, I’ll give away two prints– one to someone chosen at random, and one to the best submission. Pass the word to your friends, enemies, photography groups, etc. You can enter more than one image but don’t get too carried away… a few is OK, but not a dozen.

Small print: void where prohibited by law. Anyone who clearly violates the spirit of the rules will be disqualified. Don’t put that in your mouth… you don’t know where it’s been. Please make sure your images are worksafe. You can post more than one photo, but you’ll only get one chance at the drawing. It must be a photo that you took specifically for this assignment, not something pulled out of the archives. Play nice. Judging is at my discretion, and is final. SSA might want to show your image in a future entry, but we don’t want any other rights to it– if we want to use it for anything else, we’ll play nice and ask for your permission first.

22 Comments

Filed under Aperture, Exercise

How To Shoot Tonight’s Eclipse

My how to shoot the moon article seems to be getting a lot of hits today, probably due to tonight’s lunar eclipse. I guess this would be the time for me to tell you exactly what settings to use to get a perfect photo of the eclipse.

OK, here goes. I don’t know. I do, however, know how to figure it out.

First off, use the longest lens you have. 200mm is probably the bottom of the range. If you have a teleconverter, use it. Using a tripod or other camera support is also a really good idea, and may be absolutely necessary. Don’t get too hung up on it being tripod– a beanbag or something similar is also good. You just need the camera to hold still.

Your camera’s meter probably won’t be able to deal with the situation with any degree of reason, and autofocus can also be very hit-or-miss. Put the camera in manual mode, and manual focus mode. Set your aperture to about f/8 or f/11 and your ISO to 100. Focus.

Try taking a picture at about 1/125 sec and check it on your LCD to see how it looks. Is it too dark? If so, use a slower shutter speed– try 1/60, and if that doesn’t work try 1/30, and keep trying until you find something you like. If it’s too bright, use a faster shutter speed– try 1/250, etc. If you’ve been reading this blog, you know how to do this already.

Now, bracket bracket bracket. Bracketing is the act of taking multiple shots of the same thing, each with slightly different exposure. It’s very common for photographers to do this, because it leaves them room for error in their exposure. If you think 1/125 is the exposure, always take three shots when you shoot– 1/60, 1/125, 1/250. That way, if you’re slightly wrong then one of the other shots should be usable. I’d even recommend bracketing two stops each way– 1/30, 1/60, 1/125, 1/250, and 1/500. It’s better to take too many shots than not enough. In situations where I honestly didn’t know what exposure to use, and I really wanted to get the shot right, I’ve been known to bracket three or four stops on either side of my exposure best-guess.

As the earth’s shadow covers the moon, the moon will get dimmer. That means you’ll have to check your exposure again if you come back later. You may wind up using multi-second exposures, and you may even need to open your aperture wider. Increase your ISO if you have to. If you have a remote shutter release you’ll want to use it, or you can use your camera’s delay mode to avoid some of the shake associated with pressing the shutter button at longer exposures.

In a nutshell, what I’ve just told you to do is this: guess, then test out your guess and adjust it as necessary. That’s how I learned to take “hard” shots, and it really does work. When you’re shooting digital, test shots are very close to free, and the feedback is instantaneous.

1 Comment

Filed under Stuff